There are some people (grandparents, spouses, siblings) that I like to give a little mass produced extra in addition to a DIY creation for Christmas. However, the same situations applies... money is tight. So I search for FREEBIES to give as gifts. There really is nothing better than getting something that is normally $15+ for no more than shipping and giving it to someone and having them think you spent a small (relative) fortune on it.
Here is my current list of Freebies:
Free 2013 Photo Calendar from Vistaprint
Free Custom Mug from Vistaprint
20 Free Custom Gift Tags from InkGarden
10 Free Christmas Cards from InkGarden
Free Flip Book from Vistaprint
Free Baby Talk Magazine Subscription
Free Samples of Airborne (4 packs).... seems silly but a great stocking stuffer!
Free Jiffy Corn Bread Recipe Book (again seems silly... but think stocking stuffers people!)
50 Free 4x6 prints from Shutterfly (for new members only... create a new email if you have to)
Also, make sure that you sign up and ask to be on the email list for Walgreens, Shutterfly, Vistaprint, InkGarden, Walmart, ect. They are always emailing you freebies! And if you don't like your email being bombarded with spam make a new email specifically for freebies (and sweepstakes if you're into that kind of thing ::wink::wink::)
Wednesday, November 14, 2012
Wednesday, November 7, 2012
Traveling for Two Part 1: Airplane Travel
There is an age old question that parents frequently ask, especially around the holiday season. "How in the world do I travel with my child without completely pulling my hair out or leaving him/her on the side of the road?!" Thankfully, over the past 6.5 years I have traveled...well... A LOT. Therefore I have some tried and true methods of travel with baby/child that ensure that you will still have said child, and your wits, at the end of the trip.
This installment of Travelling for Two will be all about air travel. This is best done with only 1 child (or two if you have two adults). I can feel you cringing now. Long lines, security, close quarters, the whole bit. I get it... I really do. But this is actually one of my favorite ways to travel (minus the debilitating fear of crashing and dying in Lake Erie) and can go relatively smoothly if you follow some really simple advice.
1. Babywear- I really can't emphasize this enough. As soon as you get to the airport, whether it be at the curbside drop off or parking lot, strap that baby/toddler onto you and don't take them off! My favorite babywearing apparatus in the airport is a soft-structured carrier like a Boba or an Ergo. They are easy, distribute weight, and really comfortable. "But... but... the security person will make me take the baby out of the carrier and then put the carrier on the belt and then I have to carry the baby and blah blah blah" you exclaim. FALSE! There is a new TSA regulation that says that you do not have to take your baby out of the carrier... you simply need to have your hands swiped for explosives once you go through the fancy scanner.
2. Bring your infant seat with you- I use a convertible car seat in my car but I have an infant bucket seat for travel. I always, always bring the bucket seat with me. Do NOT check it at the front desk even if you didn't buy your baby a seat. Here is why: first of all, checking your car seat can be dangerous because they don't necessarily treat your items with love and respect. Also, if you did NOT buy baby a seat but the plane isn't full you can have the lady/guy at the gate change your seat to one with an unoccupied neighboring seat, then you can USE THE CAR SEAT for the flight! Tip for easily carrying the car seat through the airport: position the handle part not quite all the way down and not quite all the way up (there should be an in between setting) and then flip it over and hang it over the handle of your rolling carry-on.
3. Schedule your flight at the right time- this tip might work for some and backfire for others. It has always worked for me so I'll include it. If I know that I'm going to be bringing a child with me that likes to nap I schedule the flight for during nap time (or stupid early in the morning... like 6am). The reason being is that I can usually nurse the baby to sleep during take off, they sleep during the flight and then wake up refreshed and jovial upon landing. Which brings me to my next point...
4. Nurse/Feed baby on takeoff/landing- Most babies have a hard time equalizing the pressure of the elevation and often end up screaming bloody murder because they are in pain. Some people will say, give them a sucker, give them benedryl, ect. I beg of you: DO NOT DO THAT! Giving your child unnecessary sugar for a flight is not going to end well. Also, Benadryl has the opposite effect in children under 3 and will turn them into an extremely hyper mess of a human being. All a child needs to equalize pressure is light sucking motions in their mouth. Pacifiers, nursing, bottles, even a sippy cup for older kids will work wonders for them.
5. New toys/treats- If scheduling during nap time isn't an option or your kid just doesn't like to take naps I highly recommend new toys. If your kids are like mine you can probably liken their attention span to that of a fruit fly. Therefore, I would recommend buying enough new toys or a special treat for every 30 minutes that you will be on the plane. They do not need to be expensive in any way, just new and different. Go to the Dollar Tree (ya know, my favorite place) and pick up a couple things that would catch their attention.
If none of these tips help you, my last piece of advice is probably the best:
6. Try not to care- Babies cry. Children cry. Heck, even grown adults cry. Do the best you can with your baby and do not worry about the rest of the passengers. You will never see them again, you do not owe them anything. The more you stress about it, the more stressed the baby/child will become and that will just escalate the problem.
I hope this is helpful for you... happy flying!
Tuesday, November 6, 2012
A Very Cheap-O Christmas: Part 1
GIFT BASKETS!
Lets face it sometimes mass produced gift baskets can be chinsy, overdone and show little effort or forethought. But a DIY gift basket can be just the opposite! When you make it yourself you have the ability to customize something that fits the recipient to a T and paints a picture of painstaking consideration and care.
When designing these baskets-o-love its very easy to go overboard (trust me I'm the queen of overboard) and spend way more money than originally budgeted. You walk down an isle full of pint sized goodies and very quickly fill your cart, all the while imagining this elaborate creation that will surely shock and amaze the person who you will bestow this gift upon. But I challenge you... ere on the side of minimal and thoughtful instead of elaborate and expensive because you do not need to spend a lot of money to let someone know that you care.
Case and point: I was invited to a very dear friends wedding a week and a half ago and knew that between a flight out to New Jersey as well as gas money, food money, and the like I just wasn't going to have the funds to get her some big beautiful gift, or even an envelope full of money. She understands our "financial strapped-ness" and therefore I felt comfortable giving her one of my DIY creations. So I started brainstorming, and thinking, and considering. In my opinion the kitchen is a central hub of a family. It is where conversations happen, where the morning starts, and relationships are made. Yes, I was going to focus on things for her new kitchen!
My main objective was to make sure that I could stay under $10 without anything looking cheap or overly DIY. Ultimately I decided to make two mugs (a his/hers situation), a hanging towel (flippin' love those things!), and a weekly menu planner. But Lordy! How was I going to stay under $10?? Dollar Tree/Hobby Lobby here I come!!!! (Insert maniacal laugh...)
Here was my shopping list
Dollar Tree:
2 Mugs- $2
1 8x10 picture frame- $1
Kitchen Towel- $1
Sweet basket- $1
Hobby Lobby:
Pretty Printed Paper-$0.50 $0.24 (IT WAS ON SALE!!!!)
Things I had at home:
Extra fabric laying around
Black and red Sharpie markers
That's a total of $5.24! Now here's what I did with it.

Lets face it sometimes mass produced gift baskets can be chinsy, overdone and show little effort or forethought. But a DIY gift basket can be just the opposite! When you make it yourself you have the ability to customize something that fits the recipient to a T and paints a picture of painstaking consideration and care.
When designing these baskets-o-love its very easy to go overboard (trust me I'm the queen of overboard) and spend way more money than originally budgeted. You walk down an isle full of pint sized goodies and very quickly fill your cart, all the while imagining this elaborate creation that will surely shock and amaze the person who you will bestow this gift upon. But I challenge you... ere on the side of minimal and thoughtful instead of elaborate and expensive because you do not need to spend a lot of money to let someone know that you care.
Case and point: I was invited to a very dear friends wedding a week and a half ago and knew that between a flight out to New Jersey as well as gas money, food money, and the like I just wasn't going to have the funds to get her some big beautiful gift, or even an envelope full of money. She understands our "financial strapped-ness" and therefore I felt comfortable giving her one of my DIY creations. So I started brainstorming, and thinking, and considering. In my opinion the kitchen is a central hub of a family. It is where conversations happen, where the morning starts, and relationships are made. Yes, I was going to focus on things for her new kitchen!
My main objective was to make sure that I could stay under $10 without anything looking cheap or overly DIY. Ultimately I decided to make two mugs (a his/hers situation), a hanging towel (flippin' love those things!), and a weekly menu planner. But Lordy! How was I going to stay under $10?? Dollar Tree/Hobby Lobby here I come!!!! (Insert maniacal laugh...)
Here was my shopping list
Dollar Tree:
2 Mugs- $2
1 8x10 picture frame- $1
Kitchen Towel- $1
Sweet basket- $1
Hobby Lobby:
Pretty Printed Paper-
Things I had at home:
Extra fabric laying around
Black and red Sharpie markers
That's a total of $5.24! Now here's what I did with it.
Gathered my materials (pay no attention to the extra fabric and kitchen towel... I'm making one for myself too)
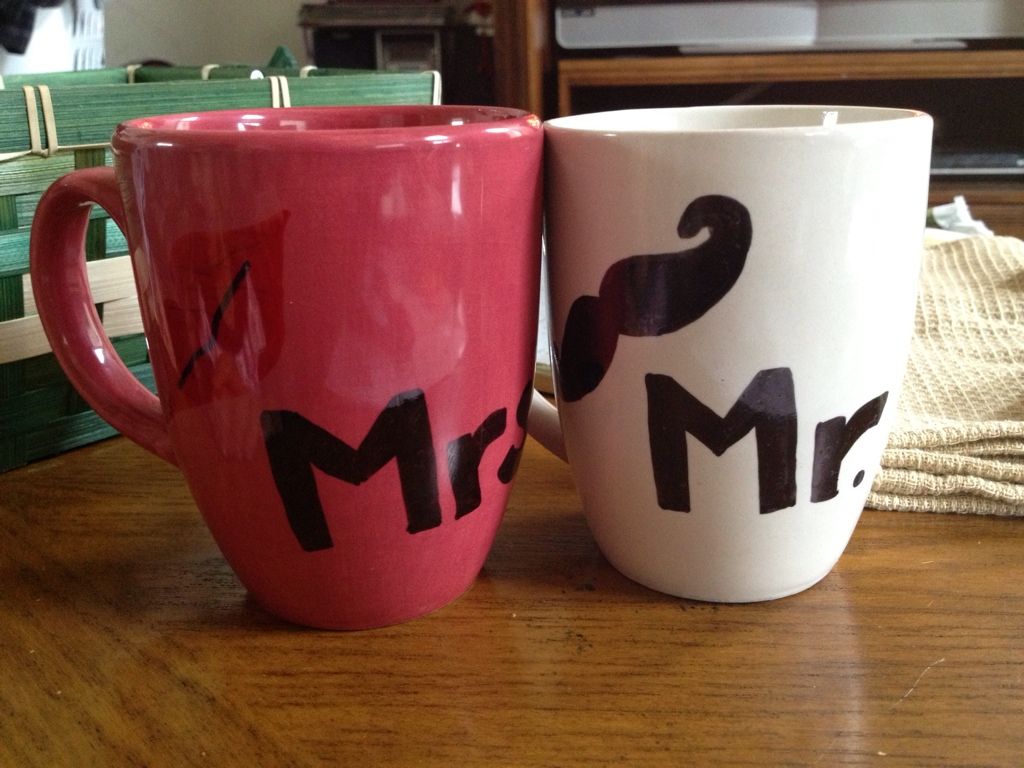
Drew lips/mustache and Mrs/Mr on each mug respectively... like sooooo
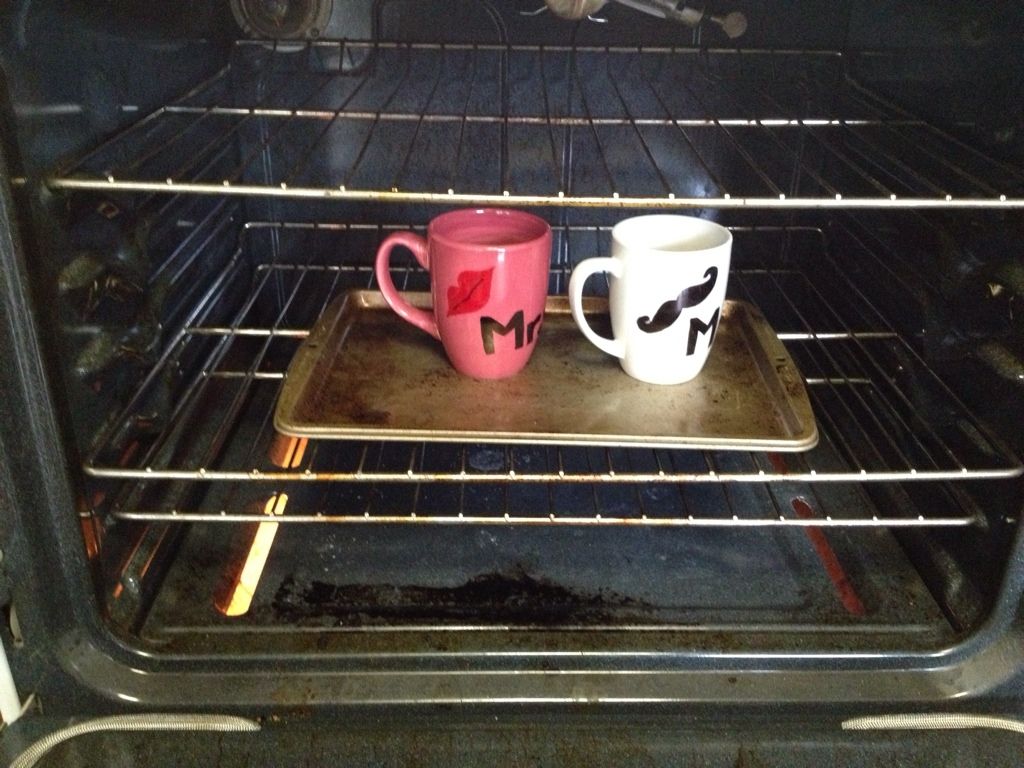
Baked for 30 minutes on 350 degrees
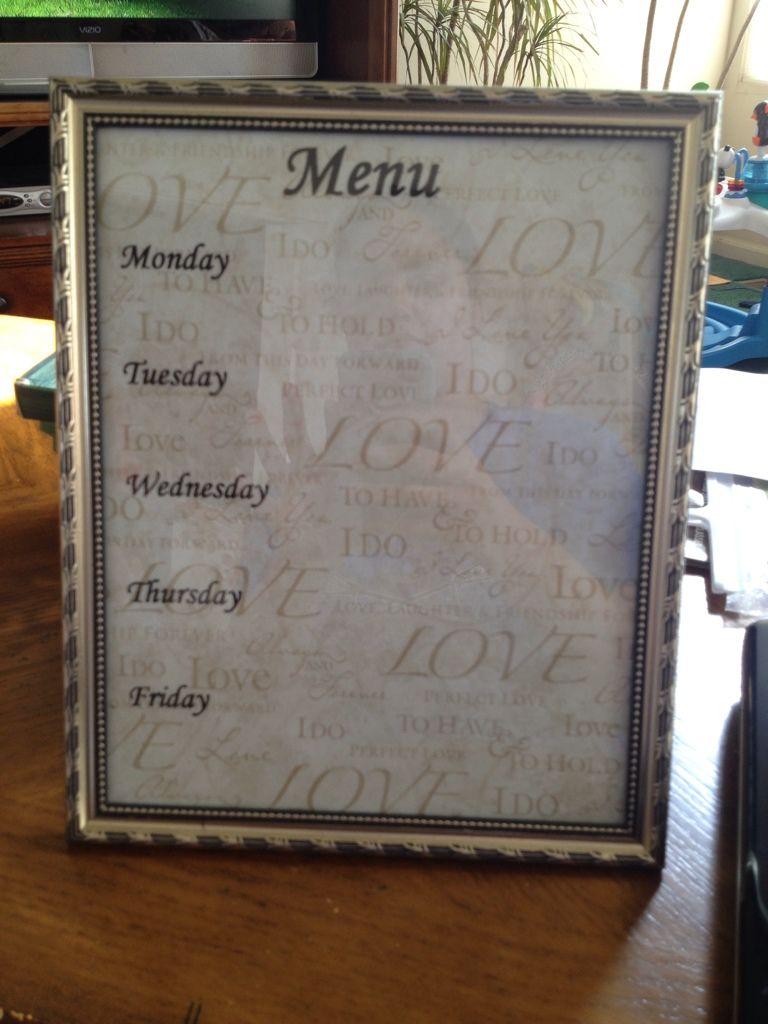
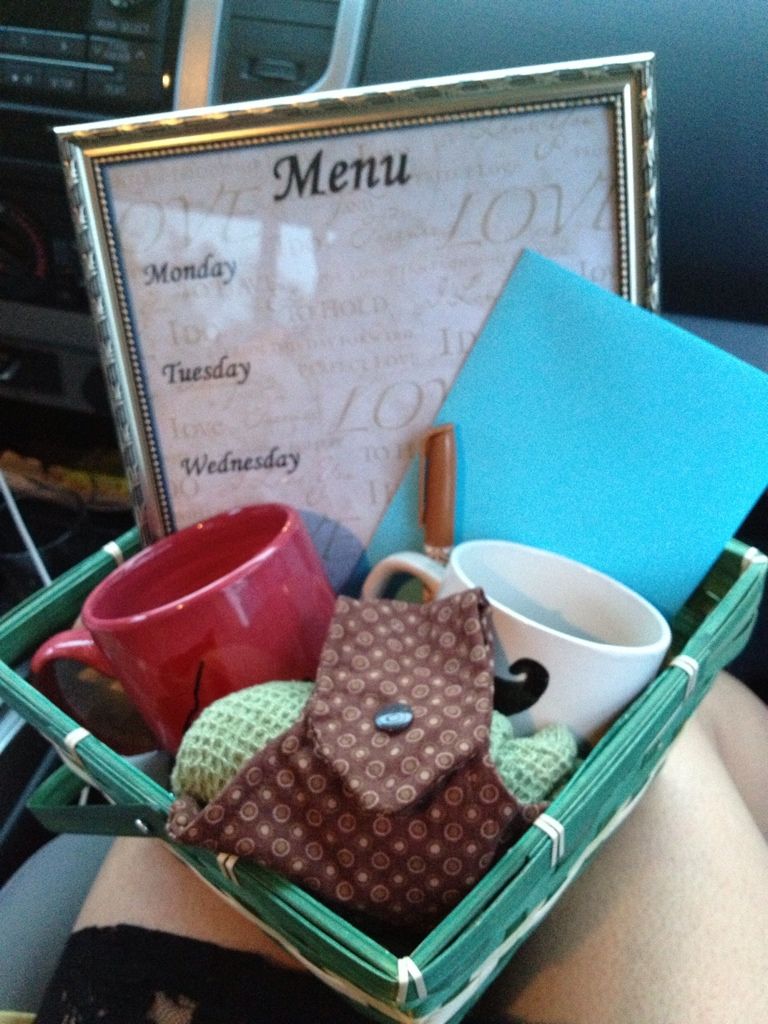
Then gather my supplies for the menu planner: Picture frame, pretty printed paper and your computer. In a word document write "Menu" at the top and then "Monday" through "Friday" down the side of the document. Please make sure that you print it on plain paper first so that you make sure that the placement is right and then you can print it on your pretty paper. Then you just pop it into your picture frame and your end result should look something like this:
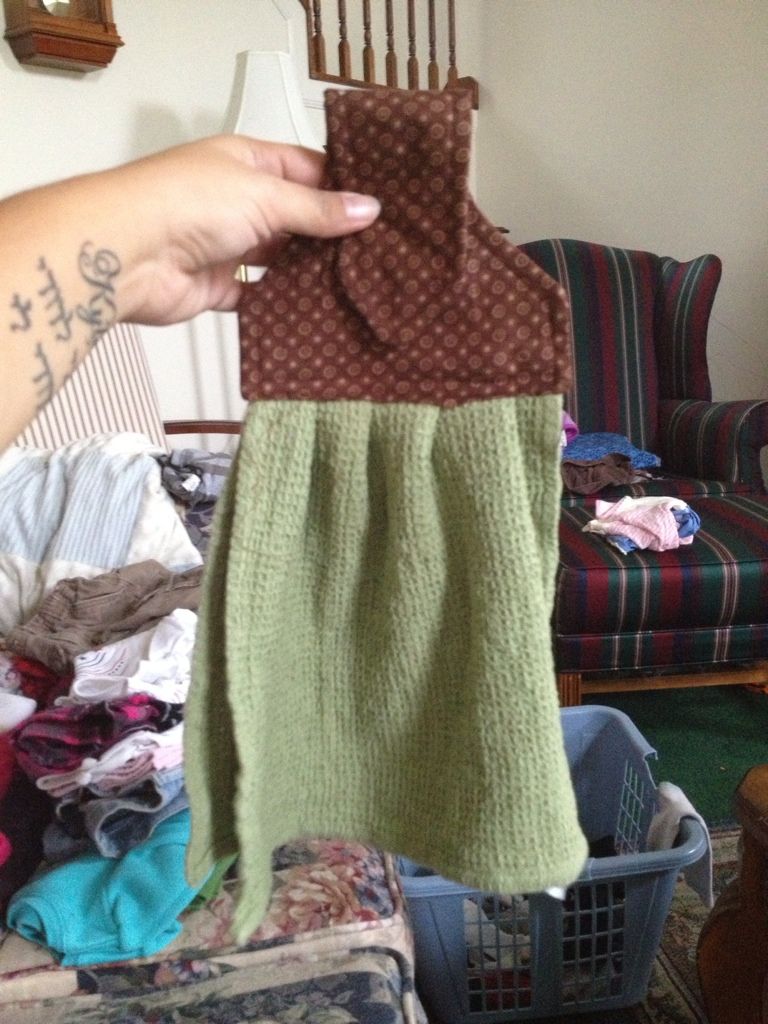
Finally you are going to gather your materials for your hanging towel. If you know anything about sewing a sing straight line this should be pretty easy for you. You could even hand sew it. Either way there is a great tutorial and pattern to show you exactly what to do. I didn't have a button so I decided to use a snap. You could do a sew on snap, I did a press on snap. Here is mine "pre-snap":
Then you just neatly place it all in the basket and stick a card in there. (This is my quick placement... I later fixed it so that it was more organized but I just didn't get a chance to take a picture of it.)
You will also want to include a dry-erase marker for the menu planner but that should NOT cost you more than $1 if you have any frugal skills what-so-ever.
Voila! This gift could be given to a newly married couple for their first Christmas, but really could go to ANYONE as long as you customize the paper what you write on the mugs. The possibilities are endless!
Stay tuned for more Cheap-O Christmas crafts and ideas!
Subscribe to:
Comments (Atom)